Techniques and Tips for Creating Depth in Fluid Art
INSTRUCTIONAL
3/27/202413 min read
Understanding Depth in Fluid Art
Before we delve into the techniques, let's first understand what depth means in the context of fluid art. Depth refers to the illusion of three-dimensionality within a two-dimensional artwork. It gives the impression that certain elements are closer or farther away, creating a sense of distance and space.
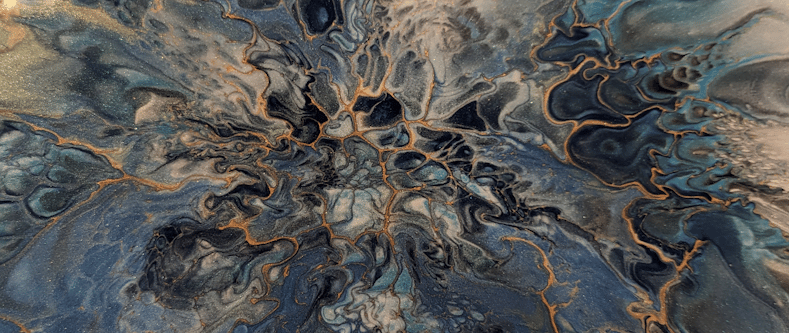
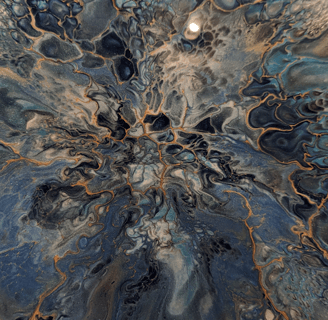
In fluid art, depth can be achieved through various methods and techniques. One of the most common techniques is layering. By layering different colors and textures on top of each other, artists can create the illusion of depth. For example, starting with a base layer of a lighter color and gradually adding darker shades on top can give the artwork a sense of depth and dimension.
Another technique that can be used to create depth in fluid art is the use of contrast. By incorporating contrasting colors, such as pairing warm and cool tones or complementary colors, artists can make certain elements appear closer or farther away. The stark contrast between these colors can create a visual separation, enhancing the perception of depth in the artwork.
Texture is also an important factor in creating depth in fluid art. By adding texture to certain areas of the artwork, artists can make those areas appear closer or more prominent. This can be achieved by using different tools or techniques to create texture, such as using a palette knife to create raised lines or adding texture mediums to the paint.
Furthermore, the use of perspective can greatly enhance the sense of depth in fluid art. By incorporating elements that create the illusion of distance, such as converging lines or diminishing sizes of objects, artists can make the artwork appear more three-dimensional. This can be particularly effective in abstract fluid art, where the artist has more freedom to manipulate the composition.
Lastly, the choice of materials can also contribute to the perception of depth in fluid art. Using paints with different viscosities, for example, can create interesting effects and layers within the artwork. Thicker paints tend to stay on the surface, while thinner paints may sink and create a sense of depth.
By understanding and utilizing these techniques, artists can create captivating and visually engaging artworks that appear to have depth and dimension, despite being two-dimensional in nature.
Layering Colors
One of the most effective ways to create depth in paint pouring is through layering colors. By layering different shades and tones of paint, you can achieve a sense of depth and dimension in your artwork.
The process begins with a base layer, which serves as the foundation for the subsequent layers. When layering colors, it is important to consider the opacity and transparency of the paints being used. Some colors may be more transparent, allowing the layers underneath to show through, while others may be more opaque, covering up the layers beneath. This interplay between transparency and opacity can create fascinating effects and contribute to the overall depth of the artwork.
To create a layered effect, artists often use a variety of techniques. One approach is to pour the paint onto the canvas in thin, controlled streams, allowing each layer to dry before adding the next. This method ensures that the colors remain distinct and separate, creating a clear visual distinction between each layer.
Another technique involves mixing different colors together before pouring them onto the canvas. This creates a marbled effect, with the colors blending and swirling together to form unique patterns and textures. By carefully controlling the consistency and viscosity of the paint, artists can manipulate how the colors interact with each other, resulting in a mesmerizing interplay of hues.
Layering colors also opens up opportunities for experimentation and creativity. Artists can play with different color combinations to achieve specific effects or moods in their artwork. For example, layering warm colors such as reds and oranges on top of cool colors like blues and greens can create a sense of contrast and vibrancy. On the other hand, layering analogous colors, which are adjacent on the color wheel, can produce a more harmonious and serene composition.
In addition to creating depth, layering colors can also add texture and dimension to a painting. As each layer dries, it may develop cracks, wrinkles, or other interesting surface effects. These textures can further enhance the overall visual appeal of the artwork, adding tactile elements that engage the viewer's senses.
Overall, layering colors is a versatile technique that allows artists to create depth, complexity, and visual interest in their paint pouring artworks. Whether through controlled pours or marbling techniques, the layering process offers endless possibilities for experimentation and creativity. By carefully considering the opacity, transparency, and color combinations, artists can achieve stunning results that captivate the viewer and bring their paintings to life.
Using Different Viscosities
Viscosity refers to the thickness or thinness of the paint. By using paints with different viscosities, you can create depth in your fluid art. Thicker paints tend to sink to the bottom, while thinner paints flow more easily. This contrast in viscosity can create interesting patterns and textures, adding depth to your artwork. Experiment with different ratios of paint and pouring mediums to achieve the desired viscosity.
When it comes to using different viscosities in fluid art, there are several techniques you can explore. One popular method is the "flip cup" technique, where you pour different colors of paint with varying viscosities into a cup and then flip it onto the canvas. As the cup is lifted, the paints mix and interact with each other, creating unique patterns and blending effects.
Another technique is the "dirty pour," where you pour different colors of paint directly onto the canvas. By using paints with different viscosities, you can achieve a layered effect as the paints interact and flow over each other. This technique allows for more control over the final result, as you can manipulate the paint with tools or tilting the canvas to create specific patterns and textures.
It's important to note that the viscosity of the paint can be adjusted by adding pouring mediums or other additives. Pouring mediums are specifically designed to improve the flow and consistency of the paint, allowing for smoother and more controlled pours. These mediums can also extend the drying time of the paint, giving you more time to work with the colors and create intricate designs.
When experimenting with different viscosities, it's essential to consider the drying time of the paint. Thicker paints will take longer to dry, while thinner paints will dry more quickly. This can affect how the colors interact and blend with each other, so it's important to plan your pours accordingly.
Overall, using different viscosities in fluid art opens up a world of possibilities. It allows you to create depth, texture, and unique patterns in your artwork. By experimenting with different techniques and ratios of paint and pouring mediums, you can achieve stunning results that showcase the versatility of this art form.
Tilt and Tilt
The tilt and tilt technique involves tilting the canvas in different directions during the pouring process. This technique allows the paint to flow and mix, creating beautiful organic patterns and adding depth to the artwork. By tilting the canvas in various directions, you can manipulate the flow of the paint and create a sense of movement and depth within the piece.
When using the tilt and tilt technique, it is important to consider the viscosity of the paint. Thicker paints will require more tilting to achieve the desired effect, while thinner paints may require less. Experimenting with different consistencies of paint can lead to unique and interesting results.
Another factor to consider when using this technique is the angle at which you tilt the canvas. Tilting the canvas at a steeper angle will cause the paint to flow more quickly, creating longer streaks and a more dramatic effect. On the other hand, tilting the canvas at a shallower angle will slow down the flow of the paint, allowing for more control and precision in the final outcome.
The direction in which you tilt the canvas also plays a role in the overall composition of the piece. Tilt the canvas in one direction, and the paint will flow in that direction, creating horizontal or vertical lines. Tilt the canvas in multiple directions, and the paint will mix and interact, creating intricate patterns and textures.
One technique that can be used in conjunction with the tilt and tilt technique is the use of a palette knife. By gently scraping the surface of the canvas while it is still wet, you can create additional texture and interest. This technique can be especially effective when combined with the flow of the paint created by the tilting process.
The tilt and tilt technique is a versatile and exciting method of creating abstract art. It allows for a great deal of experimentation and creativity, as the final outcome can be unpredictable and unique. Whether you are a beginner or an experienced artist, this technique is worth exploring as it can produce stunning results that are sure to captivate viewers.
Adding Texture
Texture is another element that can enhance the depth in your paint pouring artwork. You can add texture by incorporating various materials into your pour, such as sand, glass beads, or even dried leaves. These materials will create interesting textures and create a sense of depth within the artwork. Experiment with different textures and placements to achieve the desired effect.
When it comes to adding texture to your paint pouring artwork, the possibilities are endless. One technique you can try is mixing sand or fine grit into your paint mixture before pouring it onto the canvas. This will create a rough, grainy texture that adds dimension to your artwork. You can also sprinkle sand or fine grit onto the wet paint after pouring to create a textured surface.
Another way to incorporate texture is by using glass beads. These tiny beads can be mixed into your paint or applied directly onto the wet surface. They will create a shimmering effect and add a touch of elegance to your artwork. Experiment with different sizes and colors of glass beads to create unique textures and visual interest.
Dried leaves can also be a great addition to your paint pouring artwork. They can be pressed onto the wet surface, creating an imprint of their texture. This not only adds visual interest but also brings a natural element to your artwork. You can experiment with different types of leaves, such as maple or oak, to create different patterns and textures.
When adding texture to your paint pouring artwork, it's important to consider the overall composition and balance. You don't want the texture to overpower the rest of the painting, but rather enhance it. Play around with different combinations of texture and color to find the perfect balance that suits your artistic vision.
Remember, texture is just one of the many elements you can use to elevate your paint pouring artwork. Don't be afraid to experiment and push the boundaries of what's possible. With each new technique and material you try, you'll discover new ways to create depth and visual interest in your paintings.
Creating Cells
Cells are a popular technique in paint pouring that can also contribute to the depth of the artwork. Cells are round or irregular shapes that form on the surface of the paint due to the reaction between different densities of paint. To create cells, you can use silicone oil or other cell-inducing additives. The formation of cells adds visual interest and depth to your paint pouring piece.
When it comes to creating cells in paint pouring, there are several methods you can experiment with. One of the most common techniques is using silicone oil. Silicone oil is a popular additive that helps to create beautiful and intricate cells in your artwork. You can find silicone oil in various viscosities, and each viscosity will produce a different size and shape of cells.
To use silicone oil, you can either mix it directly into your paint or apply it on top of the poured paint. If you choose to mix it into your paint, add a few drops of silicone oil to each color before pouring them onto the canvas. This will ensure that the oil is evenly distributed throughout the paint, creating cells as the different densities interact. Alternatively, you can also apply silicone oil on top of the poured paint.
After pouring your desired colors onto the canvas, use a dropper or a small brush to apply a few drops of silicone oil in strategic areas. As the oil spreads and interacts with the paint, it will create cells in those specific spots, adding an interesting texture and depth to your artwork.
Aside from silicone oil, there are other additives you can experiment with to create cells. Some artists use alcohol, dish soap, or even hair serum to achieve similar effects. These additives alter the surface tension of the paint, causing it to separate and form cells as it dries.
When creating cells, it's important to keep in mind that the amount and placement of the additive will affect the formation of cells. Adding too much silicone oil or other additives can result in excessive cell formation, which may overpower the overall composition of your artwork. It's best to start with small amounts and gradually add more if desired.
In addition to the technique used, the choice of colors and their densities will also impact the formation of cells. Experimenting with different color combinations and layering techniques can produce unique and stunning cell patterns. It's always a good idea to test different methods and color combinations on a smaller scale before applying them to a larger canvas.
Overall, creating cells in paint pouring is a fascinating process that adds depth and visual interest to your artwork. Whether you choose to use silicone oil or other additives, the formation of cells can elevate your paint pouring piece to a whole new level. So, don't be afraid to explore different techniques and unleash your creativity to create mesmerizing cells in your artwork.
Using Metallic or Shimmering Paints
Metallic or shimmering paints can add a touch of glamour and depth to your fluid art. These paints have a reflective quality that creates the illusion of depth and dimension. When light hits the metallic or shimmering paints, it bounces off the surface, creating a captivating visual effect. Incorporate these paints strategically in your artwork to enhance the depth and create a stunning finish.
One way to use metallic or shimmering paints is by creating a focal point in your artwork. Choose a specific area or element in your painting that you want to highlight, such as a flower or a specific section of an abstract design. Apply the metallic or shimmering paint to this area using a brush or palette knife, allowing it to stand out from the rest of the composition.
Another technique is to use metallic or shimmering paints as an accent. Once you have completed your main composition, add small touches of these paints to certain areas of the artwork. This can be done by using a fine brush or even a toothpick to apply tiny dots or lines of metallic or shimmering paint. These accents will catch the light and add an extra level of interest to your piece.
Additionally, you can experiment with layering metallic or shimmering paints over other colors. Start by applying a base layer of your desired color and let it dry completely. Then, using a brush or pouring technique, apply a thin layer of metallic or shimmering paint on top. This will create a beautiful interplay between the base color and the reflective properties of the metallic or shimmering paint.
When working with metallic or shimmering paints, it's important to consider the overall composition and balance of your artwork. Too much metallic or shimmering paint can overwhelm the piece, so use it sparingly and strategically. Remember that less is often more, and a few well-placed accents can make a big impact.
Finally, don't be afraid to experiment and play around with different metallic or shimmering paint colors. There are a wide variety of shades and finishes available, from gold and silver to iridescent and pearlescent. Each color will bring its own unique qualities to your artwork, so have fun exploring different combinations and effects.
Experimenting with Pouring Techniques
There are various pouring techniques that you can experiment with to create depth in your fluid art. Some popular pouring techniques include the dirty pour, flip cup, and swipe technique. Each technique offers a unique way of manipulating the paint and creating depth within the artwork.
The dirty pour technique involves layering different colors of paint in a cup and then pouring them onto the canvas in one motion. As the colors mix and blend together, they create interesting patterns and textures that add depth to the artwork. This technique allows for a certain level of unpredictability, as you never quite know how the colors will interact with each other. (You can also read the full article on Mastering the Dirty Poor Technique.)
The flip cup technique is similar to the dirty pour, but instead of pouring the paint directly onto the canvas, you pour it into a cup and then flip the cup onto the canvas. This creates a different effect as the paint is released all at once, resulting in a more controlled pour. The colors blend together as they flow out of the cup, creating beautiful swirls and layers of color. (You can also read the full article on the Flip Cup Technique for Paint Pouring.)
The swipe technique involves pouring paint onto the canvas and then using a tool, such as a palette knife or a swipe card, to swipe across the surface of the paint. This technique creates interesting lines and textures, adding depth and movement to the artwork. By swiping the paint in different directions, you can create different effects and achieve the desired depth in your fluid art. (You can also read the full article on Mastering the Swipe Technique.)
When experimenting with pouring techniques, it's important to consider the consistency of your paint. Different pouring techniques require different consistencies of paint. For example, the dirty pour technique works best with paint that is slightly more fluid, while the swipe technique requires paint that is slightly thicker. By adjusting the consistency of your paint, you can achieve different effects and enhance the depth in your artwork.
Don't be afraid to mix and combine different pouring techniques to create unique effects and add depth to your fluid art. Experiment with different color combinations, layering techniques, and pouring methods to discover your own style and create stunning pieces of art that captivate and engage the viewer.
Paying Attention to Composition
Composition plays a crucial role in creating depth in any artwork, including fluid art. Consider the placement and arrangement of the different elements within your piece. Create a focal point or points that draw the viewer's eye into the artwork. Use lines, shapes, and color contrasts to guide the viewer's gaze and create a sense of depth and perspective.
When it comes to fluid art, the composition is even more important because of the unpredictable nature of the medium. As the colors blend and flow together, it's essential to have a clear plan in mind for how you want the final piece to look. Think about the overall balance and harmony of the composition, ensuring that no single element dominates the entire artwork.
One technique you can use to create a focal point is the rule of thirds. Imagine dividing your canvas into a grid of nine equal parts, like a tic-tac-toe board. The points where the lines intersect are the ideal spots for placing your focal point. By positioning key elements along these lines or at the intersections, you can create a visually pleasing composition that captures the viewer's attention. (You can also read the full article on The Rule of Thirds.)
Another important aspect of composition is the use of negative space. Negative space refers to the empty areas in your artwork that surround the main subjects. By strategically incorporating negative space, you can enhance the overall composition and create a sense of balance. It allows the viewer's eyes to rest and appreciate the main elements of your artwork.
Furthermore, consider the flow and movement within your composition. Fluid art is known for its organic and dynamic nature, so it's crucial to create a sense of movement within your piece. Use lines and shapes to guide the viewer's eye through the artwork, leading them on a visual journey. This can be achieved through the careful arrangement of colors, the use of directional lines, or the repetition of certain shapes.
Lastly, don't be afraid to experiment and break the rules of composition. While it's essential to understand the principles and techniques, sometimes the most captivating compositions come from taking risks and pushing the boundaries. Allow yourself the freedom to explore different arrangements and placements, embracing the unexpected outcomes that fluid art can bring.