The Flip Cup Technique for Paint Pouring
INSTRUCTIONAL
2/3/20243 min read

Introduction
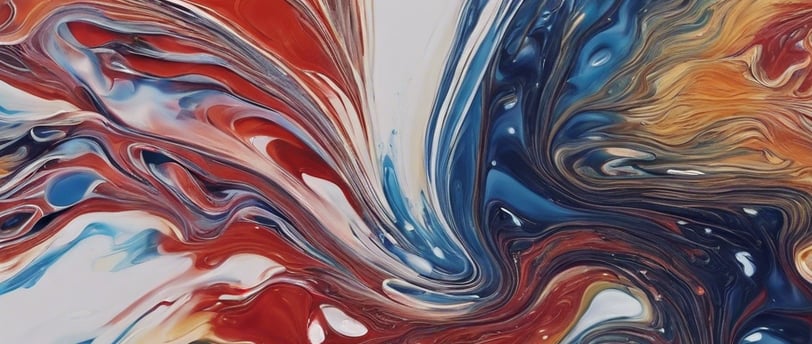
Paint pouring has gained immense popularity in recent years as a mesmerizing and creative art form. One of the most widely used techniques in paint pouring is the flip cup technique. This method involves pouring multiple colors of paint into a single cup, then flipping it onto a canvas to create stunning and unique designs. In this article, we will provide a step-by-step guide on how to master the flip cup technique, along with some tips for success and common mistakes to avoid.
Step-by-Step Instructions
Step 1: Gather Your Supplies
Before you begin, make sure you have all the necessary supplies:
- Canvas or any other surface for pouring
- Acrylic paints in various colors
- A plastic or disposable cup
- A pouring medium (such as Floetrol or Liquitex Pouring Medium)
- A stirring stick or popsicle stick
- A palette knife or spatula
- Disposable gloves
- A drop cloth or plastic sheet to protect your workspace
Step 2: Prepare Your Paints
Start by preparing your paints. Squeeze each color into separate cups, adding the pouring medium in a ratio of approximately 1:1 with the paint. Stir the mixture thoroughly until it reaches a smooth and even consistency. Repeat this process for each color you plan to use.
Step 3: Layer the Paints in the Cup
Take your plastic cup and begin layering the paints. Start with one color at the bottom of the cup, then add another color on top, and continue layering until the cup is almost full. You can create different patterns and effects by pouring the colors in different ways. For example, you can pour in a circular motion or create a zigzag pattern.
Step 4: Flip the Cup
Place the canvas on top of the cup, ensuring that it covers the entire opening. Hold the cup and canvas together firmly, then quickly and confidently flip them over. Make sure to keep the cup steady as you flip to prevent any paint from leaking out prematurely.
Step 5: Let the Paint Flow
Once the cup is flipped onto the canvas, carefully lift it and watch as the paint starts to flow and spread across the surface. Tilt the canvas gently in different directions to encourage the paint to cover the entire surface. You can also use a palette knife or spatula to guide the paint and create interesting patterns.
Step 6: Allow the Painting to Dry
After you are satisfied with the design, set the painting aside in a dust-free area and allow it to dry completely. The drying time will vary depending on the thickness of the paint and the environmental conditions. It is important to be patient and not rush the drying process to ensure the longevity of the artwork.
Tips for Success
1. Use a pouring medium: Adding a pouring medium to your paints helps to improve the flow and consistency, making it easier to create beautiful designs.
2. Experiment with color combinations: Don't be afraid to mix and match different colors to create unique and eye-catching combinations. Try using contrasting or complementary colors for a striking effect.
3. Practice your flipping technique: The key to a successful flip cup pour is a confident and swift flip. Practice flipping the cup onto a practice surface before attempting it on your canvas.
4. Tilt the canvas gently: Tilt the canvas slowly and in different directions to allow the paint to spread naturally. Avoid excessive tilting, as it may cause the colors to blend too much and lose their distinctiveness.
5. Experiment with different pouring consistencies: Varying the consistency of your paints can create different effects. Try using thicker or thinner paint mixtures to achieve different levels of cell formation or create interesting texture.
Common Mistakes to Avoid
1. Overmixing the paint: Overmixing the paint can cause the colors to blend too much, resulting in a muddy or dull appearance. Mix the paint just enough to achieve a smooth consistency.
2. Using too much paint: Pouring too much paint into the cup can lead to an overflow and loss of control over the design. Start with smaller amounts of paint and add more if needed.
3. Tipping the canvas too much: Tipping the canvas excessively can cause the paint to run off the edges, resulting in a loss of the desired design. Tilt the canvas gently and slowly to maintain control over the paint flow.
4. Not protecting your workspace: Paint pouring can be a messy process. Always use a drop cloth or plastic sheet to protect your workspace from any accidental spills or drips.
5. Rushing the drying process: Patience is key when it comes to drying your artwork. Rushing the drying process may result in cracks or uneven drying, compromising the overall quality of the painting. Allow sufficient drying time for the best results.
Conclusion
The flip cup technique in paint pouring offers endless possibilities for creating captivating and unique artworks. By following the step-by-step instructions and keeping in mind the tips for success and common mistakes to avoid, you can master this technique and unlock your creativity. So, gather your supplies, let the colors flow, and enjoy the mesmerizing world of paint pouring!